Drapery Hardware Installation Tips: General
For Curtain Rod Sets with Finials
- Grab a pencil, tape measure, level, and Phillips head screwdriver and/or drill, as well as the mounting screws and the 3/32” hex key provided by Highland Forge. Our wood screws are 3/16” diameter and SnapToggles require a ½” drill bit. SnapToggles were only included if purchased. Grabbing a friend as an extra set of hands is always helpful.
- Keep in mind that walls, ceilings, and floors can be uneven, particularly in older houses. Despite what your level says, if it looks straight, it is straight.
- Lay out your hardware on the ground in front of your window or door.
- Assemble the rod, as needed.
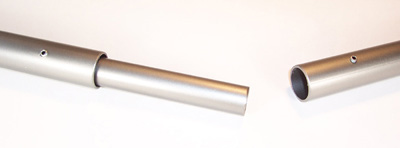
- If your rod is spliced, put the straight ends with set screws together, loosen set screws using the hex key, insert 8” to 10” internal splice connector halfway into each rod end, and then tighten the set screws. Set screws should be aligned and will face the back wall.
- Leave rod(s) in plastic sleeve(s) until ready for installation to protect against scratches or scuffs.
- Determine end bracket positions on the wall.
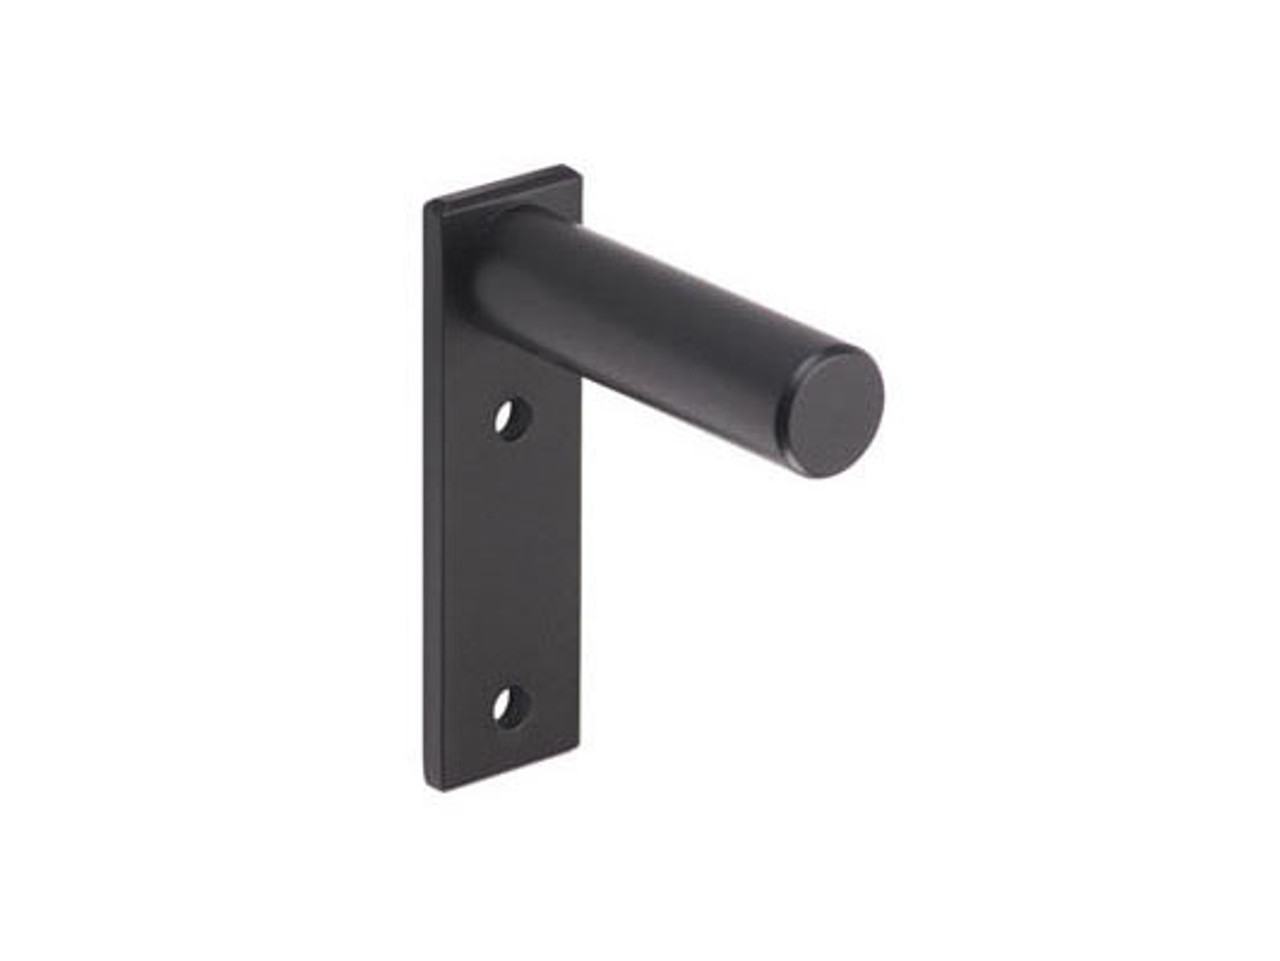
- Rods with finials include a Standard Single bracket for each end.

- Use a tape measure and/or a level to determine specific end bracket locations. Hold up end brackets to the desired installation location and use a pencil to mark the center of the mounting holes. Confirm that the mounting holes are level. You can also hold up the rod with a level to confirm.
- How high should I mount the brackets? You’ll typically mount the rod about halfway between the window casing or trim and the ceiling or molding. Oftentimes the rod is mounted as high as possible to make the window or door look taller. In that case, leave at least two inches between the top of the bracket and ceiling or molding. Be sure to consider that drapery panels should hang about ½” to 1” from the floor. Note any other potential limiting factors in your space.
- How wide should I mount the brackets? Standard Single brackets are typically mounted two to three inches from the end of the rod. They can also be installed at the very end of the rod, though we do recommend leaving room for at least one ring to sit outside the bracket.
- Install end brackets.
- Be sure to use appropriate screws and/or anchors to fasten the brackets to the wall. We included wood screws intended to be drilled into wood (e.g., studs, headers, beams). If mounting into other surfaces such as hollow drywall and plaster, make sure you are also using the appropriate anchors such as the SnapToggles that we sell. Making a safe and strong mount is very important.
- The mounting screws we provide are 3/16” diameter. The mounting holes on our brackets are ¼” diameter. This provides a bit of flexibility to adjust bracket height without drilling new holes.
- Install center bracket, as applicable.
- If your rod length is over 80”, you received a Center Single bracket to support the middle of the rod.
- Mount the rod on the end brackets, then hold the Center Single bracket up to its appropriate mounting position. If your rod is spliced, the bracket should support (and hide) the splice point. Mark the location of the mounting holes with a pencil, place rod back on the floor, and install the Center Single bracket. There is often a header above a door or window, in which case wood screws are an appropriate mounting hardware solution.
- Install the rod.
- Our rings can be loaded onto the rod before or after dropping the rod into the brackets. Depending on the length and weight of the panels, you can attach the panel to the rings before or after loading the rings on the rod.
- It is common to leave one ring between the bracket and finial.
- Set screws that join rod segments, if any, should be aligned and facing the back wall.
- Screw on the finials and you’re almost done!
- Install wands.
- If you ordered wands, simply clip the wand onto the eyelet of the lead ring. The wand typically hangs on the back side of the panel.
- Post installation tips.
- We recommend wiping the top of the rod with Pledge spray or something similar. This will reduce friction between the rod and rings and repel dust! Repeat every 6 to 12 months.
- If your rod is sliding in the brackets, a trick of the trade is to put a thin strip of duct tape in the bracket cup (sticky side down). It makes the cup smaller, creates friction, and is not visible.
- If you are using rings from a third party or grommets and they are getting stuck on a seam, a simple trick is to put a clear piece of "teflon tape" on the top of the rod. The best tape we've found is a "Wear-Resistant Slippery UHMW" (Ultra High Molecular Weight) polyethylene tape. You can get it from McMaster-Carr. You'll want the .007" thickness, clear tape. Anything thinner may tear apart, anything thicker is overkill.
For Curtain Rod Sets with French Returns
- Grab a pencil, tape measure, level, and Phillips head screwdriver and/or drill, as well as the mounting screws and the 3/32” hex key provided by Highland Forge. Our wood screws are 3/16” diameter and SnapToggles require a ½” drill bit. SnapToggles were only included if purchased. Grabbing a friend as an extra set of hands is always helpful.
- Keep in mind that walls, ceilings, and floors can be uneven, particularly in older houses. Despite what your level says, if it looks straight, it is straight.
- Lay out your hardware on the ground in front of your window or door.
- Assemble the rod, as needed.
- If your rod is spliced, put the straight ends with set screws together, loosen set screws using the hex key provided, insert 8” to 10” internal splice connector halfway into each rod end, and then tighten the set screws.
- Leave rod(s) in plastic sleeve(s) until ready for installation to protect against scratches or scuffs.
- Determine end bracket positions on the wall.
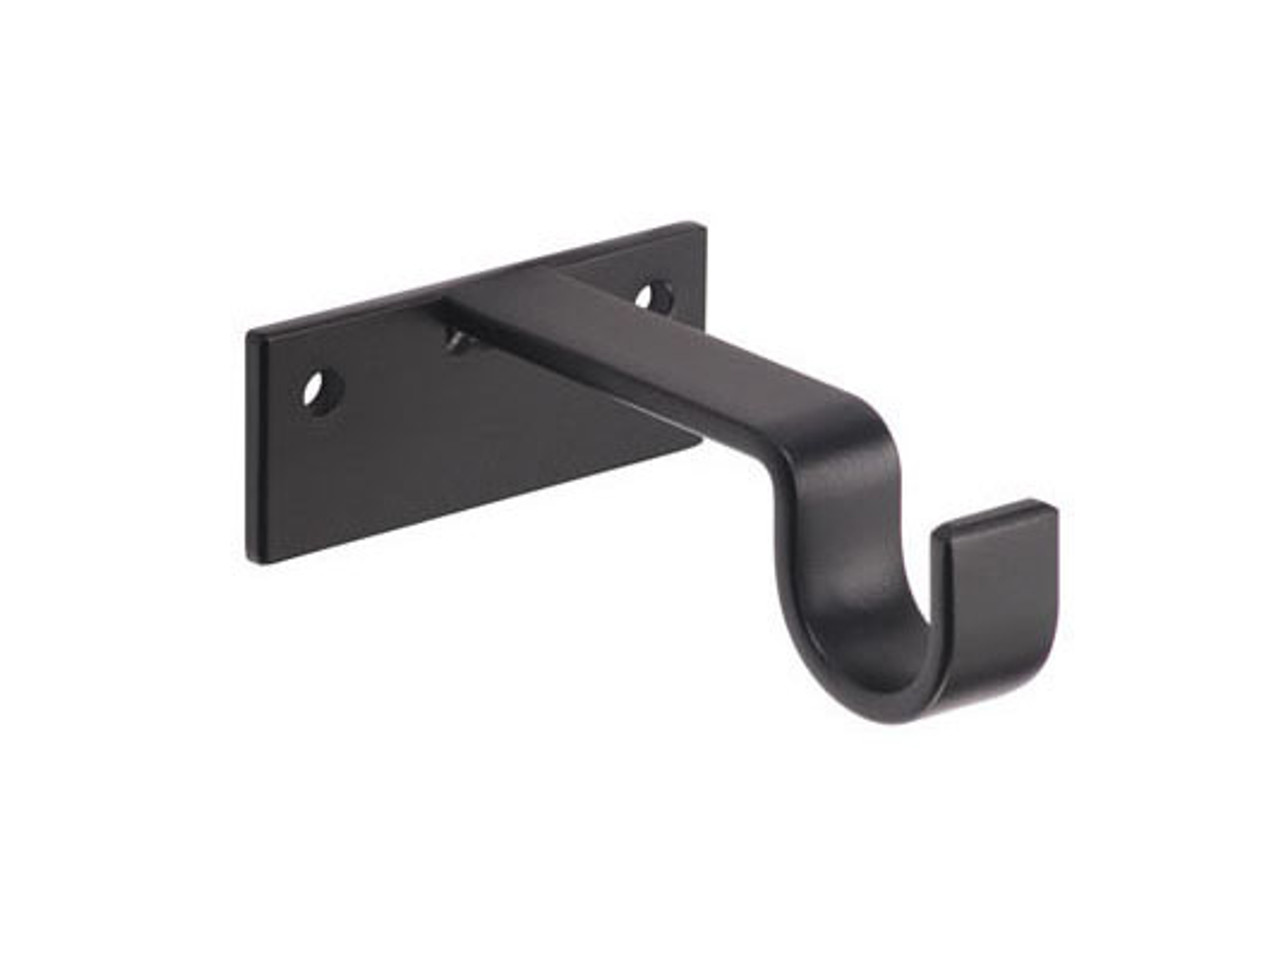
- Rods with French curved returns include a Post bracket for each end. The Post bracket should be mounted with the backplate pointed downward.
- To mark off the Post bracket locations, we suggest two options:
- Use a tape measure and/or a level to determine end bracket location. The measurement from outside edge of one bracket to the outside edge of the other should equal the length of the rod. Hold up end brackets to the desired installation location and use a pencil to mark the center of the mounting holes. Confirm that the mounting holes are level. You can also hold up the rod with a level to confirm.
- Loosen set screws on the curved returns, insert posts, and retighten the set screws. Make sure the set screws on the return legs and the Post bracket backplates are pointed down. Hold the rod and brackets up to the wall, make sure the rod looks level, mark the bracket hole locations with a pencil, and then set the rod down and remove the brackets.
- How high should I mount the brackets? You’ll typically mount the rod about halfway between the window casing or trim and the ceiling. Oftentimes the rod is mounted as high as possible to make the window look taller. In that case, leave at least two inches between the top of the bracket and ceiling or molding. Be sure to consider that drapery panels should hang about ½” to 1” from the floor. Note any other potential limiting factors in your space.
- How wide should I mount the brackets? Post brackets must be mounted at the rod ends.
- Install end brackets.
- Be sure to use appropriate screws and/or anchors to fasten the brackets to the wall. We included wood screws intended to be drilled into wood (studs, headers, beams, etc.). If mounting into other surfaces such as hollow drywall and plaster, make sure you are also using the appropriate anchors such as the SnapToggles that we sell. Making a safe and strong mount is very important.
- The mounting screws we provide are 3/16” diameter. The mounting holes on our brackets are ¼” diameter. This provides a bit of flexibility to adjust bracket height without drilling new holes.
- Install the rod.
- Slide rings onto the rod, loosen the set screws on the curved ends, slide over Post brackets, and then tighten the set screws.
- Install center bracket, as applicable.
- If your rod length is over 80”, you also received a Center Single bracket to support the middle of the rod.
- Hold the Center Single bracket up to its appropriate mounting position. The bracket should support (and hide) the splice point. Mark the location of the mounting holes with a pencil and install the Center Single bracket. There is often a header above a door or window, in which case wood screws are an appropriate mounting hardware solution.
- Install wands.
- If you ordered wands, simply clip the wand onto the eyelet of the lead ring. The wand typically hangs on the back side of the panel.
- Post installation tips.
- We recommend wiping the top of the rod with Pledge spray or something similar. This will reduce friction between the rod and rings and repel dust! Repeat every 6 to 12 months.
- If your rod is sliding in the brackets, a trick of the trade is to put a thin strip of duct tape in the bracket cup (sticky side down). It makes the cup smaller, creates friction, and is not visible.
- If you are using rings from a third party or grommets and they are getting stuck on a seam, a simple trick is to put a clear piece of "teflon tape" on the top of the rod. The best tape we've found is a "Wear-Resistant Slippery UHMW" (Ultra High Molecular Weight) polyethylene tape. You can get it from McMaster-Carr. You'll want the .007" thickness, clear tape. Anything thinner may tear apart, anything thicker is overkill.
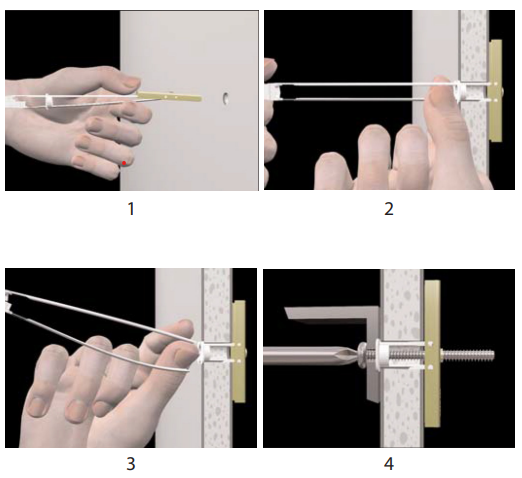
SnapToggle Installation Instructions
- SnapToggle heavy-duty toggle bolts carry twice the load in a smaller hole than standard wing anchors. A patented strap design with sturdier straps and smaller ratchet interval adjusts more precisely and snaps off flush to the surface. SnapToggle heavy-duty toggle bolts do NOT spin when installed with a screw gun and provide superior holding with metal-to-metal fastening.
- Applications: Cinder block, concrete block, gypsum board, drywall, tile over drywall, plasterboard, composite panels, cement board, greenboard, plaster, stucco, fiberglass, plywood, steel plate, plastic, and wood studs / beams.
- To install:
- Drill ½” size hole. Hold metal channel flat alongside plastic straps & slide channel through the hole. Minimum clearance behind wall: only 1-7/8".
- Hold ends of straps together between thumb & forefinger and pull toward you until channel rests behind wall. Ratchet cap along straps with other hand until flange of cap is flush with wall.
- Place thumb between straps at wall. Push thumb side to side, snapping off straps level with flange of cap.
- Place item over flange. Insert bolt and tighten until snug against item, then stop. Use machine screw or bolt to match thread in metal channel.